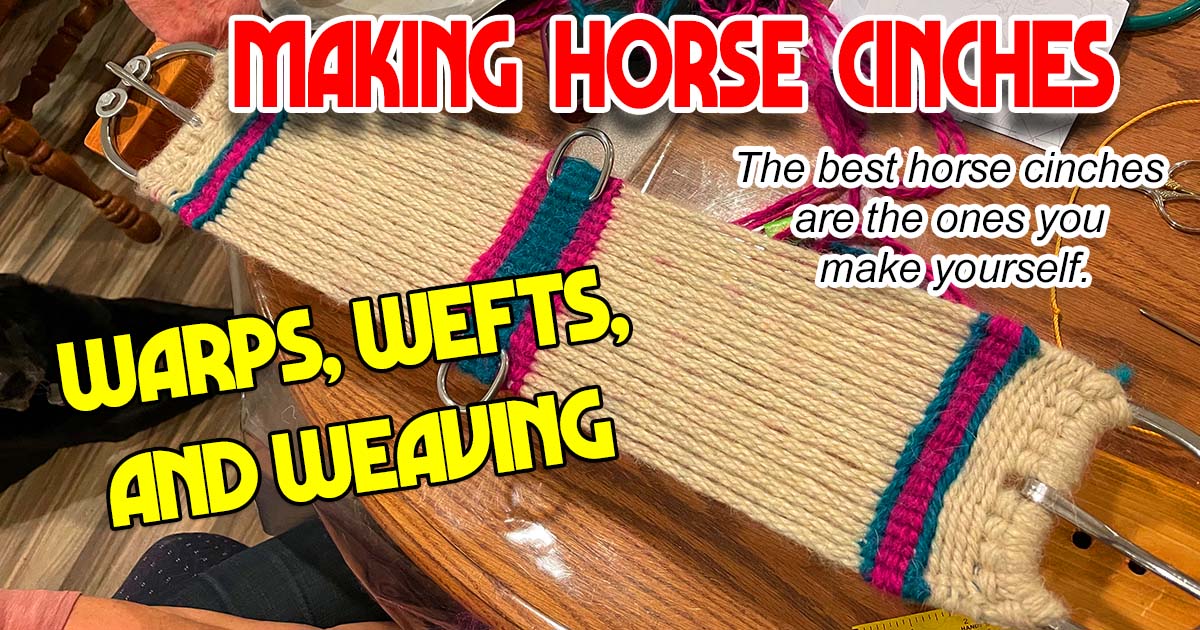
Warps, Wefts, and Weaving. Making Cinches
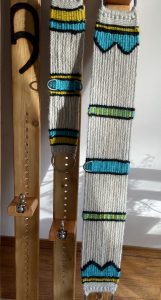
If you’re straddling a saddle, you’ll need a cinch if you want to stay on the horse. But which cinch? That’s a question that we’ve all had regarding these indispensable belts for our saddles. Cinches are often undervalued, and that’s a shame. Every ride depends on our cinch (or girth) functioning properly for both our and our horse’s safety and comfort. Yet, despite their importance, all too often, we find ourselves wandering the aisles of the local tack shop, praying they have something close to what we need. There’s a better way. You can easily make woven cinches that are objectively better in fit, function, and form than what may be available at the tack store.
A dear friend and mentor taught me the craft of making my cinches several years ago, and those lessons have saved me a lot of money and brought my mules untold comfort. Here are the tools and supplies required, and it’s a short list.
- Cinch loom, pliers, needle, tape measure, scissors
- Mohair cordage, rings, or buckles
I make my own custom cinch looms.
A scrap length of 2×4 and two nails can form a perfectly functional cinch loom. It won’t be pretty, but it’ll hold your cinch buckles just fine. Just don’t scratch the kitchen table! Raid your toolbox for the pliers and scissors. Finding the right needle may take more of a search. I like using tapestry needles as they are long, have a large eye and rounded tip that make working with the mohair cordage much easier.
Cinch Materials do Matter
I ask a lot of my animals, and they deserve the best. For that reason, I use 100% mohair cordage for their cinches. Other materials are available, but they have many downfalls. Cotton was a mainstay for cinches in the post-civil war years but will rot and stretch when soaked with horse sweat. Mohair came into vogue in the early 1900s and is softer, stronger, and lasts longer than other natural materials commonly available.
Beware the Blend
Whether you make your cinches or not, beware of commercial varieties that are not always what the advertiser wants you to believe. Many “mohair” cinches blend mohair, cotton, wool, and synthetic fibers. While the label may state “Contains 100% Mohair”, there’s generally much more to the story. For most commercially made cinches, a more accurate label would say it contains:
- Some 100% mohair and some 100% cotton.
- Some 100% wool.
- A goodly amount of 100% acrylic yarn.
A true 100% mohair cinch contains just mohair, is resistant to excessive stretch, wicks sweat and moisture away from the horse, and with use felts to a soft and smooth finish.
Rings and Buckles
When selecting your cinch hardware, make sure to use materials resistant to corrosion. I look to the gear that fishermen use for inspiration. Stainless steel may cost a few cents more, but it will last much longer without rusting. Nickel-plated buckles and rings have a thin veneer of nickel covering a plain steel surface. In practical terms, this means that with repeated wear through use, the plating will eventually wear away, exposing the underlying rust-prone metal. By contrast, stainless steel is the same substance all the way through. Using stainless steel hardware means that its corrosion resistance will not change over time.
Putting it all together
Once you’ve assembled your tools and materials, it’s time to start stringing your cinches. Since we began using saddles, cinch making has followed the same basic pattern. Lock the buckles or rings in jigs set a fixed distance apart. String the cinch by looping the cordage material back and forth, from ring to ring, until you’ve reached the required width. Then, to hold the strands together, bars are braided below the rings and across the center. Of course, it’s a little more complicated than that, but not by much. The following is an abbreviated description of the process.
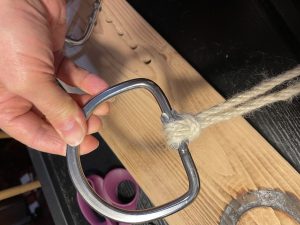
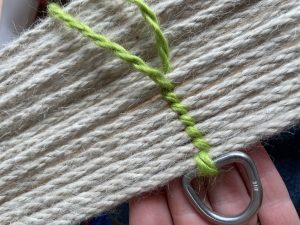
The Lark’s head is the start of every cinch.
Once you’ve set the total length of your cinch by locking down your buckles, it’s time to start stringing the warp cords. Warps are the lengths of cordage that run lengthwise or longitudinally between the buckles and create the tautness of the main body of the cinch. I secure the warp cords with a series of lark’s head knots tied to each buckle.
The lark’s head, also known as a cow hitch, has been used since at least the first century when a Greek doctor described the knot. Whether in cinches or surgical knots, the lark’s head is a valuable tool in your knot tying repertoire.
Consistent tension of warp cords is critical in creating a cinch. The goal is to have each warp cord under the same pressure from each buckle, and failure to do so will develop sags and gaps in your finished cinch. Mr. Bork of Bork Saddlery taught me to use 10 pounds of pressure on each cord, and that’s what I aim for.
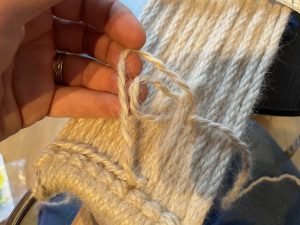
Finishing the buckle ends.
When you’ve reached your desired width, secure the warp cords by unwinding the plys of each cordage end and tying a series of half hitches around each warp, going perpendicular to the warps.
The half hitch is a simple overhand knot, where the working end of a line is brought over and under the standing part.
Once the main body of the cinch has been established, and the warps are secured, it’s time for the crossbars, which are perpendicular to the warp cords. I generally create at least one crossbar in each cinch. A crossbar in the center of the cinch holds dees to attach a breast collar and rear cinch. You can add more bars to provide additional support for the warp cords or for purely decorative purposes.
Twining a crossbar.
Crossbars are created using a twining technique. With this the weft cordage is twisted around each other as it is interlaced with the warp cords. The warp cords are the support network for the weft.
That’s it
And that is, in the most basic of terms, the making of a woven cinch. The preceding words only touch upon the broadest parts of the task. However, every horseman possesses the skills to create perfectly functional cinches. You’ll be making a custom cinch for your horse that will be superior to those found in most tack shops. If you’d like more details of constructing a cinch, please let us know, and we can create future articles.
If you’d like an in-person cinch-making class check out the TrailMeister clinics page.
For more information regarding trail riding and horse camping as well as the world’s largest and only accurate guide to horse camps, visit me at www.TrailMeister.com. You can also find more of my ponderings in my book The ABCs of Trail Riding and Camping with Horses; Click here to buy it here on Amazon.